The Ogres are coming to get ya!
I managed to finish two more Ogres/Ogors of the Red Maw Tribe, a Leadbelcher and an Irongut. I did the basecoats almost exactly one year ago, since I wanted to submit them to the last edition of Dave's "Paint What You Got" challenge, but didn't manage to finish them - so I'll submit them to this year's challenge instead.
Both Ogres are slightly converted. The helmet and weapon of the Irongut are from the Mournfang Riders kit, which offers a nice collection of two-handed weapons and armour.
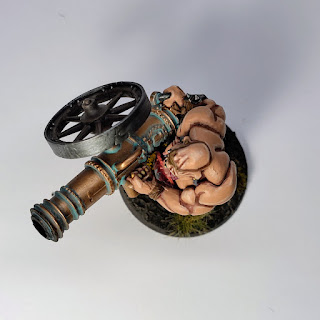
I added a wheel to the Leadbelcher's cannon to give the impression that the Ogre just picked up a cannon from the battlefield and uses it against its former owners. I stole this idea from fellow blogger Wudugast, be sure to check out his original conversion. I used a chariot wheel from Mini Monsters - seems like they are now producing cannon wheels as well so I might make another similar Leadbelcher in the future.
I had a lot of fun painting the bronze cannon, adding verdigris and grime where it made sense. Additionally, I tried to push myself a bit when painting the skin, adding edge highlights to places other than the face and I'm quite happy with the results.
Next up are the remaining two D&D characters of our party, which I hope to finish in the next two weeks.


Well done. I like the bloody weapon a lot.
ReplyDeleteThanks, glad you like it! Ogres and gore go together like peanut butter and jelly, haha
DeleteIt's no coincidence that O G R E and G O R E consist of the same letters ;)
DeleteHaha, you're absolutely right! :D
DeleteThe ogre grabbing a piece of the cannon from the ground is a cool idea. We like the painting style you used, with very sharp shading and highlighting.
ReplyDeleteAs soon as we saw the photos before reading, we thought that these were also reinforcements for your D&D party... but instead we can't wait to find out which heroes will emerge from your workbench!
Thanks a lot! I'm currently working on the remaining D&D characters, hope to finish them soon!
DeleteExcellent conversions and painting snapfit, and the extra work on the skin is really paying of
ReplyDeleteThanks, Dave! I'm still not completely sure where to put the highlights on the skin, but it's getting better, haha
DeleteIf you imagine the sun or light source is directly above the model, it's where the light would hit, so look at the model from above, and the bits you can see are where the light would hit, and these are the bits you highlight, hope this helps.
DeleteThanks, that's a useful tip, I'll give it a try!
DeleteNice touch adding the wheel to the cannon! If you're feeling brave splattering the other chap with tamiya red would be cool too - must have been a bit of arterial spray after bludgeoning some poor soul with that huge mattock! Apologies, if I'm teaching you to suck eggs but adding a touch of black ink to tamiya red gives you some really nice crusty dried blood effects as well - it kind of coagulates like blood since the Tamiya isn't water based - definitely use an old brush though!
ReplyDeleteThanks for the tip! Never heard of Tamiya Red before, sounds useful - I'll give it a try!
Delete